Barn Signs, A Door and Back to Cherubs

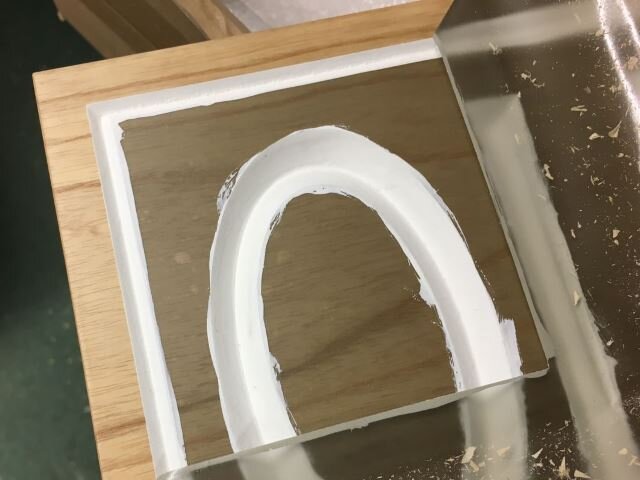
This week I have started creating the many 3D models for the Chimney Piece’s for No.3 - more on that in a moment though. I did also manage to fit in a quick job to make a sign for a friend who has just moved into a new barn conversion. This was made from an Ash shelf that was surplus to another job so basically a very nice piece of scrap. Before carving I applied a layer of sign makers vinyl over the smooth surface and then v-carved through it which you can see in the first image below. After it was carved it got a couple of coats of white paint into the letters and border and then once dry the vinyl was peeled off. You can see the corner peeled back exposing the smooth edge in the second image. Finally I started applying what will be at least 3 coats of UV resistant Danish Oil, you can see the sign below after the fist of these looking very nice indeed.

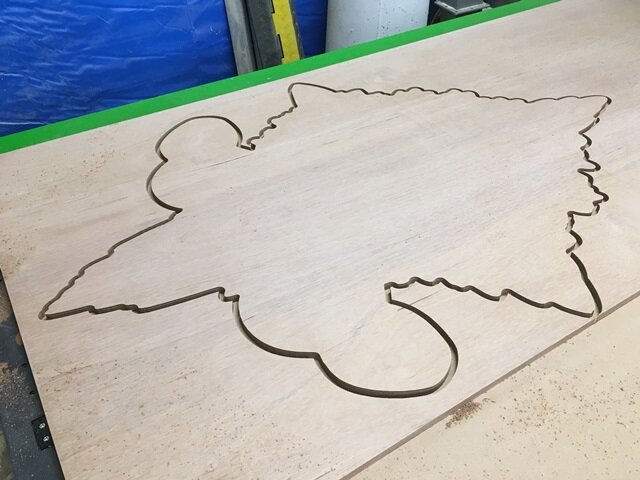
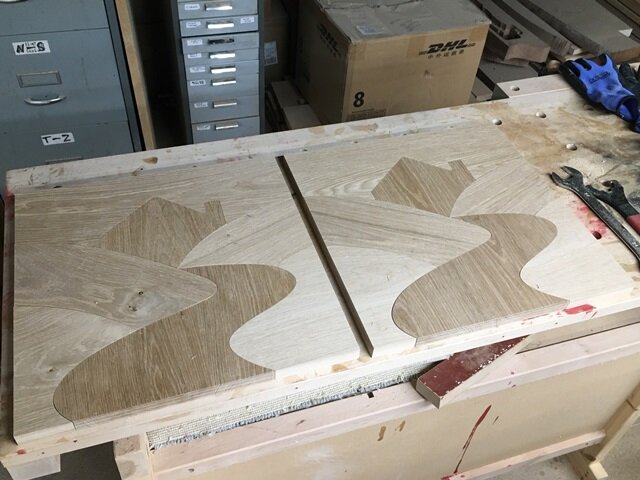
Something else I did last week but had not taken a photo of was to make an MDF door in the style of the other doors we made for No.3. This is for an electrical cupboard so needed to be thinner and was therefore easier to machine out of one piece of 25mm MDF. You can see it pre-finishing in the first image below. Finally as mentioned at the start I’ve been working on starting to model all the parts for the ornate Chimney Piece installations for No.3. the first model I made is based on a cherub from Saint Paul’s Cathedral in London. You can see the result of a this in the test maquette I cut. This is shown partially machined and then finished in the second and third images below. I was really happy with this at version one which is rare. So I’m now about 50% through the next model. Expect to see more of these over the next week or two. Over and out.

Reception Desks, Comic Panels and Pen Tidy

A good mix of things going on in the workshop this week. First up, a reception desk I’ve been helping the guys downstairs with for the last few weeks. One of the main things for this was the programming to cut the large veneered panels and the oak tops on the big green CNC. Tom gave me the drawings in DXF form for me to bring into the Vectric software, organise and create toolpaths. We had a bit of fun with some breaking tools while cutting the tops due to some power issues in the workshop but thankfully it did not damage the workpiece although it did shatter two half-inch tools.

In the first image below you can see the underside of one the oak stave boards being machined and in the second image one of the desks being pre-fitted in the workshop. The third image shows the logo of the company the desks are being made for. These were cut in different pieces of oak and then colour stained and limed to match their colours. This ended up looking great, with the grain specially positioned to flow in a different direction for each piece. The next three images show the installed desks with logos and lettering attached. Amazing job by the guys downstairs at Thomas Philpott Cabinet Makers on the design, cabinet making and install on this.

One of the other companies on the farm where the workshop is makes really nice custom VW campers. They asked me if I wanted to make some internal door panels for a customer of theirs who loves the Silver Surfer. Below you can see what I came up with. The material is black Valchromat with silver paint on the surface and then machined through to expose the black. After these are sealed and lacquered they’ll be put into a lightweight metal frame to make a really interesting internal door for the van.

Lastly a quick project for home, a pen tray to go into a drawer to help keep it tidy and stop me moaning if I’m trying to find a pen… This was a bit more heavy duty than I’d intended as I used some fairly thick pieces of (admittedly very nice) scrap maple. In the first image you can see the tray being cut from some 40mm thick butcher block then the second image shows the legs that were cut out of a 25mm thick board end. After cutting they were sanded, glued and screwed together with a quick coat of Danish oil to finish. You can see the finished tray nestled at the back of the drawer in the last image. Next week unless something new comes up it’ll be back on the big cherub and maybe on the chimneypiece…

Finials Finished and Letters

Not too much to write about this week, plenty of time in the workshop but it was spent making the rest of the finals for the ceiling at No.3 - you can see these being put into their rectangular sections with the egg and dart in the first image below. Finials complete I cut some letters for the large cherub sign - I was pleased to be able to use an odd shaped piece of scrap, proving that occasionally these things we keep, just in case, do come in handy… You can see the letters being machined out of this in the second image and then the cutout letters in the third. Next week I should get back onto the large cherub sign and finally get back onto the chimney piece project. Onward and upward.

I did do a bit of work updating the Gallery section of the website too so there is a bit more of my work on there now, I really should remember to do this more often.

Finals cont.

Hope anyone finding this is staying well and coping in the uncertain times we continue to navigate. On the CNC this week I’ve continued to make more finials for the ceiling panels for No.3. The guys downstairs in the workshop have been putting these to good use assembling them (see second image below) with the egg and dart sections they’ve already pre-cut to size (see first image). There are about 50 of these surrounds that make up the coffered ceiling, so I’ve still got plenty more finials to cut and they’ve got a lot more to assemble. I think we can see the light at the end of the tunnel though, hopefully next week. Then I can start thinking about the chimney pieces for this room. In addition in the third image below you can see the current iteration of the big cherub sign. This has had the lower wings and banner glued and a coat of primer to help see what additional hand-carving and finishing is required. Next week its more finials and then hopefully onto something different… onwards and upwards.

The Finial Factory

As expected this week I went into production mode for the finials for the ceiling panels surround at No.3. Below you can see the second batch I cut being profiled in the first picture and then the top side finishing in the second. The process for machining these involved pocketing the MDF board and pre-drilling it so the blocks can be accurately located and screwed securely from the back of the sheet. The tops are then profiled and finish cut with a 1/2 inch ballnose tool as shown. The dowel holes are cut so they can be located into the pre-drilled board accurately when flipped over. The second side is cut with the same process once flipped and lined up. Once off the machine the blocks are hand cut and finished to size. In the third image below you can see how these will be assembled with the egg and dart and other moulding to make the lower part of the cornice for the ceiling panels. There are around 50 of these panels so it’ll require 200 of these finials. Out of the first batch I got about 20 good ones, there are always a few casualties as you tweak the process. The second 25 were all good, so only around 155 to go… So next week will be more of the same.

Quick Jobs, an Octagonal Finial and a Wooden Sign

I hope anyone finding this is staying well in our uncertain times, for a short distraction you can read my overview of some of the things happening in the workshop this week…

We’ve finally finished making the many metres of egg & dart moulding which is a relief. As well as Igor, the big CNC has also been cutting it relentlessly too as you can see in the first picture below. These lengths are now ready to start building the boxes for the coffered ceiling at No.3. The second picture was a quick set of MDF jigs I made for the lads in the workshop to install Perkomatic closers into some hotel doors. The third image below is the marine ply base for my very big Cherub sign that was just cut today. So next week I can start to actually assemble it as a single piece and finish hand-working the carvings.

Next up was a prototype finial I made. This will be installed into the coffered ceiling panel corners that the egg & dart is going to be part of. I made this as a proof of concept for how they’ll look and to give me an idea how I’m going to make efficiently. Next week if the material for these turns up then I’ll be in full factory mode as I’ll need to make 200 of them… Below you can see the top side being roughed and finished in the first two images and the complete part in the third.

Finally, today I was working on parts for a sign that will go onto a reception desk job for the workshop. This includes two logos and some lettering. Below you can see some of the lettering having been cut in the first image and in the second image a template to help install this lettering when the time comes for that. Finally the third image below shows the two logos which are made from interlocking pieces of oak. These were cut in a way that uses the grain in different directions. These parts will have a round edge put on them by hand-router and then be stained different colours to match the companies logo. This will look really effective when its complete. That’s all for this week. Stay safe.

More Egg & Dart and Cakes

I’ve had a more workshop filled week this week but its all been spent making egg & dart moulding, so not too much to talk about. You can see 10 lengths of what I’ve been carving in the first image below. The middle image shows some of the moulding that I programmed from home a few weeks ago that was cut by the guys in the workshop on the big CNC. Here it has been mitred to make column tops.

Finally our home baking was completed last weekend with my kids making their versions of the sweet cake that looks savoury. On the left in the third image below is my sons, “bangers, mash & peas” cake and on the right my daughters “sushi rolls”. Both these looked great and tasted much better than either my cake or my wife’s. After two weekends of baking we did end up with fatigue both for making and even eating the cakes… which I did not think was possible.

Workshop and Home Projects - Back to Business

I’ve been back in the workshop for a few days this week, we’ve now got some zones setup so we can work safely. Everything currently in progress is to get all the pieces together for the ceiling panels for No. 3. Below you can see some of the raised and fielded panels for this in the first image, then in the next photo you can see the many metres of egg and dart we’ve started machining on both CNC’s. This will be part of a complex cornice that will go around each panel. There are several weeks of machining ahead to get all these cut. The third image below shows some facial surgery I had to do on the big cherub face which had got some water on it from a roof leak, so there had been some minor splitting. This is now looking much better.

The fourth and fifth photos show my kids working on their Design and Technology projects that they both drew in my Aspire software. Finally the last photo is another home diversion, we had a Bake-Off style challenge to make a cake that looked like savoury food. This is my Kebab and Chips cake. It looked much better than it tasted, although the shortbread chips were OK. It has made me realise what a mammoth effort it is each week for the real Bake-Off contestants. That’s all for this week, stay safe.